Implementing a device
1. Step-by-step guide
This guide explains the steps required to implement an electric meter in OpenEMS Edge that is connected via Modbus/TCP. The meter itself is simulated using a small Modbus slave application, so no external hardware is required for this guide.
The tutorial is based on the Getting Started guide. If you are coming directly from there, make sure to stop OpenEMS Edge and OpenEMS Backend first in the Eclipse IDE via the red Terminate button in the console view.
1.1. Create a new OSGi Bundle
For more information see OSGi Bundle.
-
In the menu choose File → New → Other
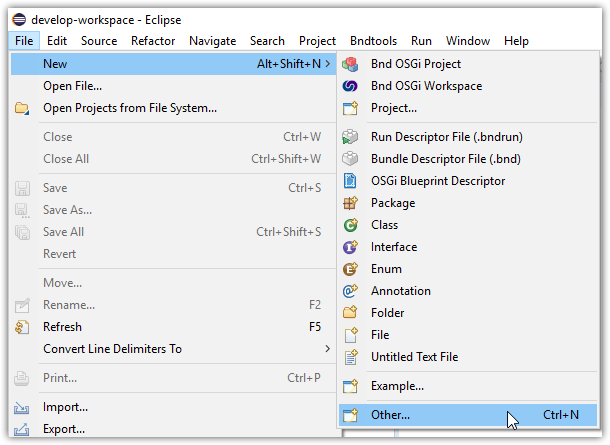 Figure 1. Creating a new project in Eclipse IDE
 -
Select Bndtools → Bnd OSGi Project and press Next >
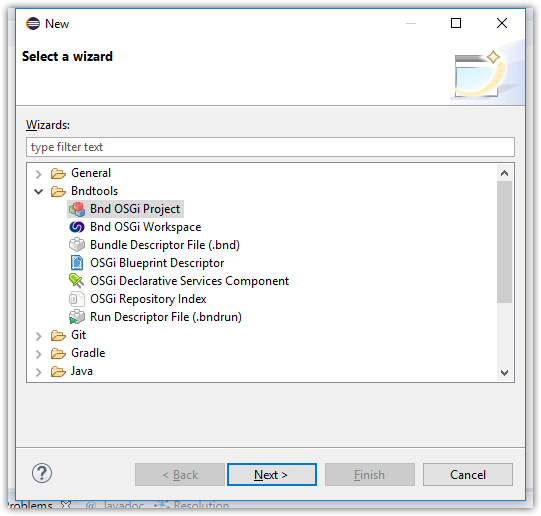 Figure 2. Creating a Bnd OSGi Project in Eclipse IDE
 -
Select OpenEMS Templates → OpenEMS Modbus Device and press Next >
If the templates are missing, restart the IDE 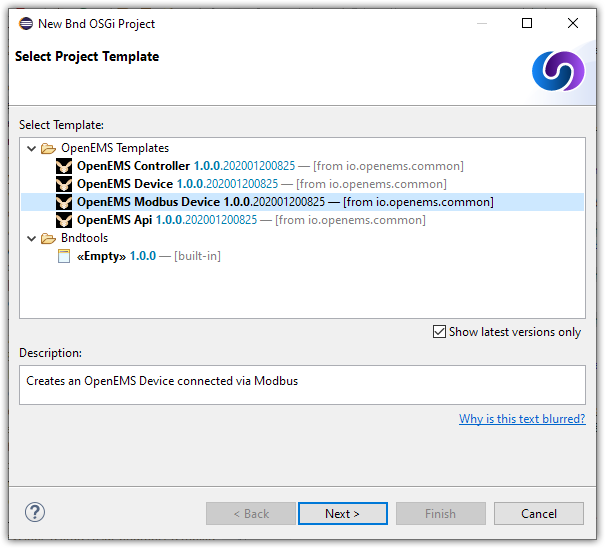 Figure 3. Creating an OpenEMS Modbus Devices Bundle in Eclipse IDE
 -
Choose a project name and press Finish
The project name is used as the folder name in OpenEMS source directory. The naming is up to you, but it is good practice to keep the name lower case and use something like io.openems.[edge/backend].[purpose/nature].[implementation]. For the simulated meter io.openems.edge.meter.simulatedis a good choice.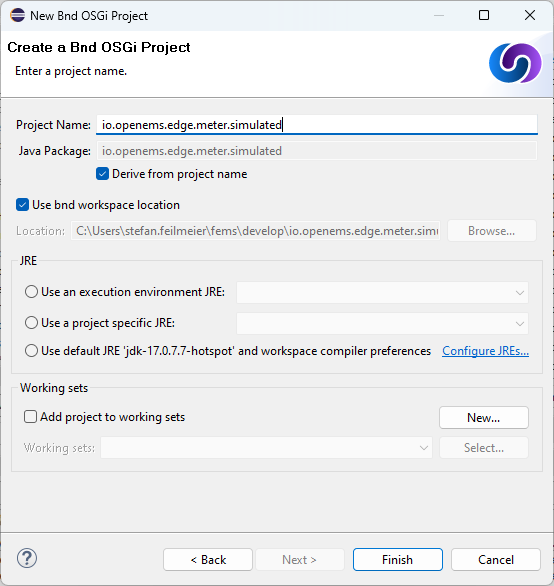 Figure 4. Naming an OpenEMS Modbus Device Bundle in Eclipse IDE
 -
The assistant closes and you can see your new bundle.
1.2. Define Bundle dependencies
OSGi Bundles can be dependent on certain other Bundles. This information needs to be set in a bnd.bnd file.
-
Select the component directory src → io.openems.edge.meter.simulated
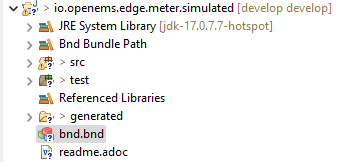 Figure 5. New simulated meter OpenEMS Modbus Devices Bundle in Eclipse IDE
 -
Open the bnd.bnd file by double clicking on it.
-
Open the Build tab
You can see, that the Bundle is by default dependent on some core bundles
- ${buildpath}
-
applies some defaults defined in
/cnf/build.bnd - io.openems.common
-
OpenEMS commons
- io.openems.edge.bridge.modbus
-
the Modbus Bridge provides the Bridge services for Modbus/RTU and Modbus/TCP protocols
- io.openems.edge.common
-
OpenEMS Edge commons
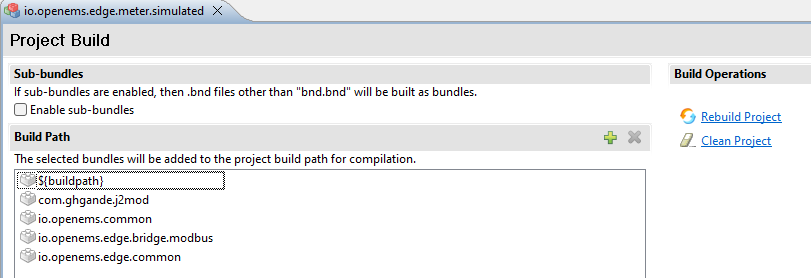 Figure 6. Bndtools Build configuration
 -
Click the + symbol next to Build Path.
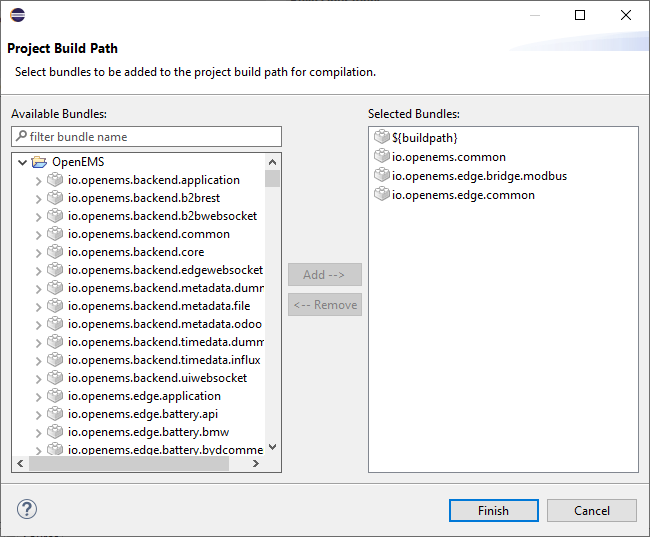 Figure 7. Bndtools Project Build Path configuration
 -
Use the Project Build Path assistant to add the following Bundle as dependency:
- io.openems.edge.meter.api
-
The Meter API Bundle provides the interfaces for OpenEMS Edge Meter Nature.
-
It is also a good moment to configure the Bundle meta information. Still inside the bnd.bnd file open the Source tab. Adjust the meta information - it will help the users of your component:
Bundle-Name: OpenEMS Edge Meter Simulated
Bundle-Vendor: OpenEMS Association e.V.
Bundle-License: https://opensource.org/licenses/EPL-2.0
Bundle-Version: 1.0.0.${tstamp}

-buildpath: \
	${buildpath},\
	io.openems.j2mod,\
	io.openems.common,\
	io.openems.edge.bridge.modbus,\
	io.openems.edge.common,\
	io.openems.edge.meter.api,\

-testpath: \
	${testpath}
The ;version=latest declaration is not required and can be removed. Also it is best practice to sort the buildpath bundles alphabetically.
|
1.3. Define configuration parameters
OpenEMS Components can have several configuration parameters. They are defined as Java annotations and specific OSGi annotations are used to generate meta information that is used e.g. by Apache Felix Web Console to generate a user interface form (see Getting Started).
-
Open the Config.java file inside
src/io.openems.edge.meter.simulatedby double clicking on it. -
Adjust the following lines in the template:
-
In the
@ObjectClassDefinitionset thenameto"Meter Simulated"and thedescriptionto"Implements the simulated meter.". -
Set the default value of the
String id()attribute to"meter0". -
After the
boolean enabled()attribute add aMeter-Typeattribute:@AttributeDefinition(name = "Meter-Type", description = "Grid, Production (=default), Consumption") MeterType type() default MeterType.PRODUCTION;Eclipse will complain, that MeterTypeis unknown. Press Ctrl + Shift + o to update the Java imports. -
Set the
String webconsole_configurationFactory_nameHint()default value to"Meter Simulated [{id}]"
-
-
The content should now match the following code:
package io.openems.edge.meter.simulated;

import org.osgi.service.metatype.annotations.AttributeDefinition;
import org.osgi.service.metatype.annotations.ObjectClassDefinition;

import io.openems.edge.meter.api.MeterType;

@ObjectClassDefinition((1)
		name = "Meter Simulated", //
		description = "Implements the simulated meter.")
@interface Config {

	@AttributeDefinition(name = "Component-ID", description = "Unique ID of this Component")
	String id() default "meter0"; (2)

	@AttributeDefinition(name = "Alias", description = "Human-readable name of this Component; defaults to Component-ID")
	String alias() default ""; (3)

	@AttributeDefinition(name = "Is enabled?", description = "Is this Component enabled?")
	boolean enabled() default true; (4)

	@AttributeDefinition(name = "Meter-Type", description = "Grid, Production (=default), Consumption") (5)
	MeterType type() default MeterType.PRODUCTION; (6)

	@AttributeDefinition(name = "Modbus-ID", description = "ID of Modbus bridge.")
	String modbus_id() default "modbus0"; (7)

	@AttributeDefinition(name = "Modbus Unit-ID", description = "The Unit-ID of the Modbus device.")
	int modbusUnitId() default 1; (8)

	@AttributeDefinition(name = "Modbus target filter", description = "This is auto-generated by 'Modbus-ID'.")
	String Modbus_target() default "(enabled=true)"; (9)

	String webconsole_configurationFactory_nameHint() default "Meter Simulated [{id}]"; (10)

}
1 The @ObjectClassDefinition annotation defines this file as a Meta Type Resource for OSGi configuration admin. Use it to set a name and description for this OpenEMS Component. 2 The id configuration parameter sets the OpenEMS Component-ID (see Channel Address). Note: A default ID 'meter0' is defined. It is good practice to define such an ID here, as it simplifies configuration in the UI. 3 The alias configuration parameter sets the human-readable name of this OpenEMS Component. If no alias is configured, the Component-ID is used instead. 4 The enabled parameter provides a soft way of deactivating an OpenEMS Component programmatically. 5 The @AttributeDefinition annotation provides meta information about a configuration parameter like name and description. 6 The 'Meter' nature requires definition of a MeterType that defines the purpose of the Meter. We will let the user define this type by a configuration parameter. 7 The 'Modbus-ID' parameter creates the link to a Modbus-Service via its OpenEMS Component-ID. At runtime the user will typically set this configuration parameter to something like 'modbus0'. 8 The Modbus service implementation requires us to provide the Modbus Unit-ID (also commonly called Device-ID or Slave-ID) of the Modbus slave device. This is the ID that is configured at the simulated meter. 9 The Modbus_target will be automatically set by OpenEMS framework and does usually not need to be configured by the user. Note: Linking other OpenEMS Components is implemented using OSGi References. The OpenEMS Edge framework therefor sets the 'target' property of a reference to filter the matched services. 10 The webconsole_configurationFactory_nameHint parameter sets a custom name for Apache Felix Web Console, helping the user to find the correct bundle.
1.4. Implement the OpenEMS Component
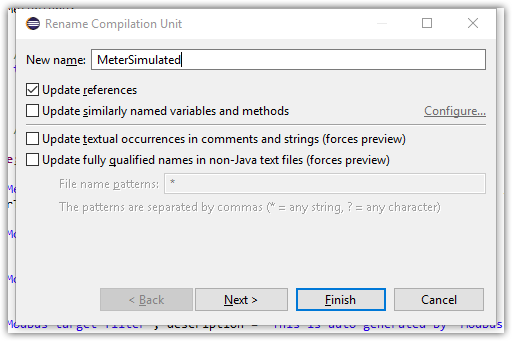
The Bndtools assistant created a MyModbusDevice.java and a MyModbusDeviceImpl.java files. First step is to set proper names for these files. To rename a file, select it by clicking on it and choose Refactor → Rename… in the menu. Write MeterSimulated and MeterSimulatedImpl respectively as 'New name' and press Finish.
Afterwards adjust the following content in the template MeterSimulatedImpl.Java:
-
In the
@Componentannotation set thenameto"Meter.Simulated":@Component(// name = "Meter.Simulated", // immediate = true, // configurationPolicy = ConfigurationPolicy.REQUIRE // )This name is the Factory-ID of your Component. It is used in various places as a unique identification. -
Make the class implement the
ElectricityMeternature (and fix the import error again with Ctrl + Shift + o)public class MeterSimulatedImpl extends AbstractOpenemsModbusComponent implements MeterSimulated, ElectricityMeter, OpenemsComponent, ModbusComponent { -
Eclipse still complains and now underlines the class name
MeterSimulatedImplwith the error The type MeterSimulatedImpl must implement the inherited abstract method ElectricityMeter.getMeterType(). Resolve it by adding an implementation of thegetMeterType()method:@Override public MeterType getMeterType() { return this.config.type(); } -
Tell the OpenEMS framework that
MeterSimulatedprovides the ElectricityMeter Channels, by adjusting the constructor:public MeterSimulatedImpl() { super(// OpenemsComponent.ChannelId.values(), // ElectricityMeter.ChannelId.values(), // ModbusComponent.ChannelId.values(), // MeterSimulated.ChannelId.values() // ); } -
Finally we need to declare the modbus protocol of the simulated meter inside the
defineModbusProtocolmethod. Replace the existing method@Override protected ModbusProtocol defineModbusProtocol() { // TODO implement ModbusProtocol return new ModbusProtocol(this); }with
@Override
protected ModbusProtocol defineModbusProtocol() {
	return new ModbusProtocol(this, //
			new FC3ReadRegistersTask(1000, Priority.HIGH,
					m(ElectricityMeter.ChannelId.ACTIVE_POWER, new SignedWordElement(1000))));
}
and solve the import errors again as described above.
-
Additionally it is advisable to implement a
debugLog()method. This method provides information for the continuous log output of OpenEMS, provided by the DebugLogController. We use it to print the current ActivePower value of the meter. Replace the existing method@Override public String debugLog() { return "Hello World"; }with
@Override
public String debugLog() {
	return "L:" + this.getActivePower().asString();
}
The content of MeterSimulatedImpl.java should now match the following code:
package io.openems.edge.meter.simulated;

import org.osgi.service.cm.ConfigurationAdmin;
import org.osgi.service.component.ComponentContext;
import org.osgi.service.component.annotations.Activate;
import org.osgi.service.component.annotations.Component;
import org.osgi.service.component.annotations.ConfigurationPolicy;
import org.osgi.service.component.annotations.Deactivate;
import org.osgi.service.component.annotations.Reference;
import org.osgi.service.component.annotations.ReferenceCardinality;
import org.osgi.service.component.annotations.ReferencePolicy;
import org.osgi.service.component.annotations.ReferencePolicyOption;
import org.osgi.service.metatype.annotations.Designate;

import io.openems.common.exceptions.OpenemsException;
import io.openems.edge.bridge.modbus.api.AbstractOpenemsModbusComponent;
import io.openems.edge.bridge.modbus.api.BridgeModbus;
import io.openems.edge.bridge.modbus.api.ModbusComponent;
import io.openems.edge.bridge.modbus.api.ModbusProtocol;
import io.openems.edge.bridge.modbus.api.element.SignedWordElement;
import io.openems.edge.bridge.modbus.api.task.FC3ReadRegistersTask;
import io.openems.edge.common.component.OpenemsComponent;
import io.openems.edge.common.taskmanager.Priority;
import io.openems.edge.meter.api.ElectricityMeter;
import io.openems.edge.meter.api.MeterType;

@Designate(ocd = Config.class, factory = true) (1)
@Component((2)
		name = "Meter.Simulated", (3)
		immediate = true, (4)
		configurationPolicy = ConfigurationPolicy.REQUIRE (5)
)
public class MeterSimulatedImpl extends AbstractOpenemsModbusComponent (6)
		implements MeterSimulated, ElectricityMeter, OpenemsComponent, ModbusComponent { (7)

	@Reference
	private ConfigurationAdmin cm; (8)

	@Reference(policy = ReferencePolicy.STATIC, policyOption = ReferencePolicyOption.GREEDY, cardinality = ReferenceCardinality.MANDATORY)
	protected void setModbus(BridgeModbus modbus) {
		super.setModbus(modbus); (9)
	}

	private Config config = null;

	public MeterSimulatedImpl() {
		super((10)
				OpenemsComponent.ChannelId.values(), //
				ElectricityMeter.ChannelId.values(), //
				ModbusComponent.ChannelId.values(), //
				MeterSimulated.ChannelId.values() //
		);
	}

	@Activate
	private void activate(ComponentContext context, Config config) throws OpenemsException { (11)
		if (super.activate(context, config.id(), config.alias(), config.enabled(), config.modbusUnitId(), this.cm,
				"Modbus", config.modbus_id())) {
			return;
		}
		this.config = config;
	}

	@Override
	@Deactivate
	protected void deactivate() { (12)
		super.deactivate();
	}

	@Override
	protected ModbusProtocol defineModbusProtocol() { (13)
		return new ModbusProtocol(this, (14)
				new FC3ReadRegistersTask(1000, Priority.HIGH, (15)
						m(ElectricityMeter.ChannelId.ACTIVE_POWER, new SignedWordElement(1000)))); (16)
	}

	@Override
	public MeterType getMeterType() { (17)
		return this.config.type();
	}

	@Override
	public String debugLog() { (18)
		return "L:" + this.getActivePower().asString();
	}
}| 1 | The @Designate annotation is used for OSGi to create a connection to the Config annotation class. It also defines this Component as a factory, i.e. it can produce multiple instances with different configurations. | ||||
| 2 | The @Component annotation marks this class as an OSGi component. | ||||
| 3 | The name property sets the unique name of this component. It is used to store configuration in the filesystem, to identify the component inside Apache Felix Web Console, and so on. Configure a human-readable name in the form [nature].[vendor].[product]. | ||||
| 4 | The immediate property defines whether the component should be started immediately. Configure the Component to be started immediately after configuration, i.e. it is not waiting till its service is required by another Component. | ||||
| 5 | The configurationPolicy define that the configuration of the Component is required before it gets activated. | ||||
| 6 | To ease the implementation of a Modbus device we can extend the AbstractOpenemsModbusComponent class.
|
||||
| 7 | The class implements OpenemsComponent. This makes it an OpenEMS Component.
The Device that we are implementing is an ElectricityMeter. We already defined the required Channels in the _initializeChannels() method. Additionally the Component also needs to implement the Nature interface.
|
||||
| 8 | The super.activate() method requires an instance of ConfigurationAdmin as a parameter. Using the @Reference annotation the OSGi framework is going to provide the ConfigurationAdmin service via dependency injection. |
||||
| 9 | The Component utilizes an external Modbus Component (the Modbus Bridge) for the actual Modbus communication. We receive an instance of this service via dependency injection (like we did already for the ConfigurationAdmin service). Most of the magic is handled by the AbstractOpenemsModbusComponent implementation, but the way the OSGi framework works, we need to define the @Reference explicitly here in the actual implementation of the component and call the parent setModbus() method. |
||||
| 10 | We call the constructor of the super class (AbstractOpenemsModbusComponent/AbstractOpenemsComponent) to initialize the Channels of the Component. It is important to list all ChannelId-Enums of all implemented Natures. The call takes the ChannelId declarations and creates a Channel instance for each of them; e.g. for the ElectricityMeter.ACTIVE_POWER ChannelId, an object instance of IntegerReadChannel is created that represents the Channel. |
||||
| 11 | The activate() method (marked by the @Activate annotation) is called on activation of an object instance of this Component. It comes with a ComponentContext and an instance of a configuration in the form of a Config object. All logic for activating and deactivating the OpenEMS Component is hidden in the super classes and just needs to be called from here. | ||||
| 12 | The deactivate() method (marked by the @Deactivate annotation) is called on deactivation of the Component instance. | ||||
| 13 | AbstractOpenemsModbusComponent requires to implement a defineModbusProtocol() method that returns an instance of ModbusProtocol. The ModbusProtocol class maps Modbus addresses to OpenEMS Channels and provides some conversion utilities. Instantiation of a ModbusProtocol object uses the Builder pattern | ||||
| 14 | Creates a new ModbusProtocol instance. A reference to the component itself is the first parameter, followed by an arbitrary number of 'Tasks' (implemented as a Java varags array). | ||||
| 15 | FC3ReadRegistersTask is an implementation of Modbus function code 3 "Read Holding Registers" . Its first parameter is the start address of the register block. The second parameter is a priority information that defines how often this register block needs to be queried. Following parameters are an arbitrary number of ModbusElements.
|
||||
| 16 | Here the internal m() method is used to make a simple 1-to-1 mapping between the Modbus element at address 1000 and the Channel ElectricityMeter.ChannelId.ACTIVE_POWER. The Modbus element is defined as a 16 bit word element with an signed integer value.
|
||||
| 17 | The ElectricityMeter Nature requires us to provide a MeterType via a MeterType getMeterType() method. The MeterType is provided by the Config. |
||||
| 18 | Finally it is always a good idea to define a debugLog() method. This method is called in each cycle by the Controller.Debug.Log and very helpful for continuous debugging. |
1.5. JUnit tests
OpenEMS comes with an advanced test framework based on JUnit. The test scenarios are defined inside the test folder. The template we used before provides example implementations for MyConfig.java and MyModbusDeviceTest.java. We highly recommend implementing JUnit tests, because down the line it simplifies 'dry' coding (i.e. without using physical hardware) and assures high quality of the code you write. There are plenty of simple and advanced examples for JUnit tests throughout the OpenEMS project.
Update the MyConfig.java file with the following lines to simulate the type configuration:
...
@SuppressWarnings("all")
public class MyConfig extends AbstractComponentConfig implements Config {

	protected static class Builder {
		...
		private MeterType type;
		...
		public Builder setType(MeterType type) {
			this.type = type;
			return this;
		}
		...
	}
	...
	@Override
	public MeterType type() {
		return this.builder.type;
	}
	...
}
Add the type configuration also to the MyModbusDeviceTest.java file to get a fully functional first JUnit test:
package io.openems.edge.meter.simulated;

import org.junit.Test;

import io.openems.edge.bridge.modbus.test.DummyModbusBridge;
import io.openems.edge.common.test.AbstractComponentTest.TestCase;
import io.openems.edge.common.test.ComponentTest;
import io.openems.edge.meter.api.MeterType;

public class MyModbusDeviceTest {

	private static final String COMPONENT_ID = "component0";
	private static final String MODBUS_ID = "modbus0";

	@Test
	public void test() throws Exception {
		new ComponentTest(new MeterSimulatedImpl()) //
				.addReference("cm", new DummyConfigurationAdmin()) //
				.addReference("setModbus", new DummyModbusBridge(MODBUS_ID)) //
				.activate(MyConfig.create() //
						.setId(COMPONENT_ID) //
						.setModbusId(MODBUS_ID) //
						.setType(MeterType.GRID) //
						.build())
				.next(new TestCase());
	}

}
Right click on the MyModbusDeviceTest.java file in Eclipse and select Run As → JUnit Test to execute the test. Or select Coverage As → JUnit Test to see which code is already covered by your current JUnit test.
1.6. Start the device simulator
To start the device simulator, open the io.openems.edge.bridge.modbus project and navigate to the test → io.openems.edge.bridge.modbus folder. There you find the ModbusSlaveSimulator.java file. Right-click that file and select Run As → Java Application.
|
This ModbusSlaveSimulator runs a small Modbus-TCP Slave-Server, that provides some constant values:
In the end of this guide, you will see a production of '500 W' - where '500' comes from register address 1000. |
The Modbus-TCP Slave-Server opens on the non-standard port 8502. The default standardized port for Modbus-TCP is 502, but we chose 8502 here, because if you run this example on a Linux system it will not allow you to occupy ports below 1024.
|
1.7. Enable the Component
To enable the Component for running, open the io.openems.edge.application project and open the EdgeApp.bndrun file.
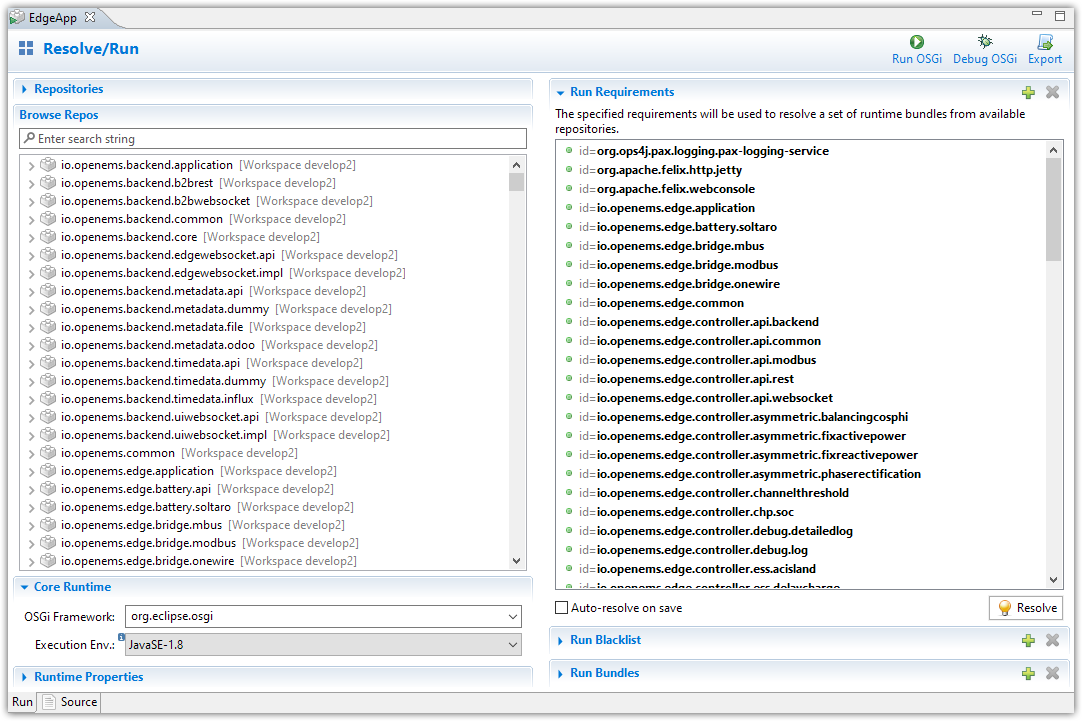
Select the io.openems.edge.meter.simulated bundle in the left Repositories list and drag & drop it to the Run Requirements list.
Press Ctrl + s to save the EdgeApp.bndrun file.
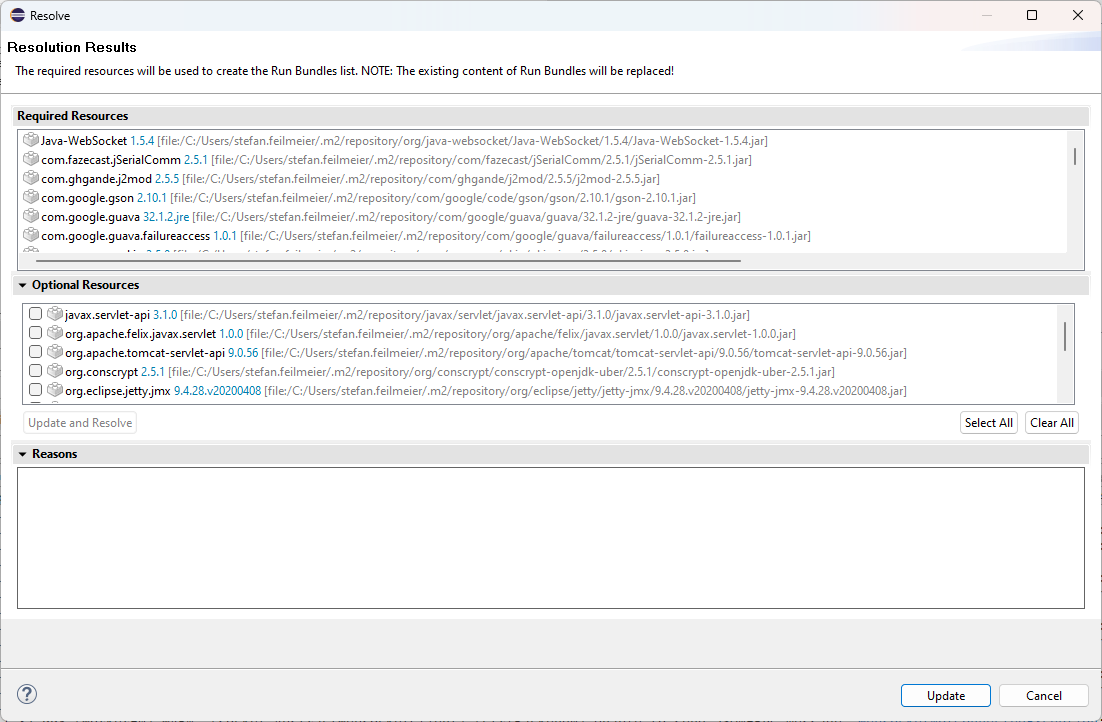
Click on Resolve to update the list of bundles that are required to run OpenEMS Edge. After a few seconds the Resolution Results window should appear; acknowledge by pressing Update.
|
These steps changed the content of the 'EdgeApp.bndrun' file. You can observe the changes inside the Source tab:
The Also you may have found, that the existing entries are sorted alphabetically. Now switch back to Run view. |
1.8. Run the implementation
Press Run OSGi to run OpenEMS Edge.
From then you can configure your component as shown in Getting Started guide. To avoid misconfiguration, remove all the Components you configured during Getting Started. Then add the following configurations inside Apache Felix Web Console:
- Controller Debug Log
-
-
Component-ID:
ctrlDebugLog0 -
Is enabled:
checked
-
- Scheduler All Alphabetically
-
-
Component-ID:
scheduler0 -
Is enabled:
checked
-
- Bridge Modbus/TCP
-
-
Component-ID:
modbus0 -
Is enabled:
checked -
IP-Address:
localhost -
Port:
8502(non-standard, as explained above)
-
- Meter Simulated
-
-
Component-ID:
meter0 -
Is enabled:
checked -
Meter-Type:
PRODUCTION -
Modbus-ID:
modbus0 -
Modbus Unit-ID:
1
-
In the Eclipse IDE console log you should see an output like this:
[re.Cycle] INFO [ntroller.debuglog.DebugLogImpl] [ctrlDebugLog0] _sum[State:Ok Production:500 W Consumption:500 W] meter0[L:500 W]
It shows a Production of 500 W which is the value provided by the simulated meter device. Congrats!
1.9. Debug the implementation
If you experience any errors you can always run OpenEMS Edge using the Debug OSGi button in EdgeApp.bndrun. This allows you to stop code execution at any time using Breakpoints.
1.10. Alternative Device Development Flow
Instead of adding the device to the EdgeApp.bndrun file (as described in Enable the Component), the device can be loaded dynamically by using [Apache Felix File Install]. Copying the device’s built jar file into a load folder, relative to the project’s root directory. Apache Felix File Install watches this folder and handles the device automatically.
The folder is configurable by supplying the felix.fileinstall.dir option when starting the edge app. More configuration options can be found in the Apache Felix File Install documentation.
| This functionality can also be used in production environments albeit dynamic code loading without additional safety measures is not recommended. |
| Same applies to the OpenEMS Backend for dynamically loading devices. |
1.11. Check the Tests of Your Module
Before continuing with the development and implementation, it’s important to ensure that your module’s tests are passing. This helps in maintaining the quality and functionality of the module. To check the tests of your module, execute the following Gradle command in the root directory of OpenEMS:
Run ./gradlew :io.openems.edge.io.shelly:test in the root Directory to check the tests of your module.