Deploy OpenEMS Edge
1. Debian Linux
This chapter explains how OpenEMS can be deployed on a Debian Linux Internet-of-Things Gateway. Similar techniques will work for other operating systems as well.
This guide covers a simple, manual approach. For productive systems it is required to automate deployment to IoT devices. Good approaches include a Debian package repository that provides *.deb-files and third-party tools like Eclipse Hawkbit. This is out-of-scope for this small guide.
Prerequisites:
-
A target device running Debian Linux like a Raspberry Pi, Beaglebone Black or an IoT gateway. You need the IP address and SSH access.
-
Create a JAR-file that should be deployed. See Build OpenEMS Edge for details. Alternatively you may download the latest release
openems-edge.jarfile from GitHub under Assets. -
Setup an SSH client to connect to the Linux console, e.g. KiTTY
-
Setup an SCP client to copy the JAR file via SSH, e.g. WinSCP
1.1. Connect via SSH and SCP
-
Connect via SSH using KiTTY
-
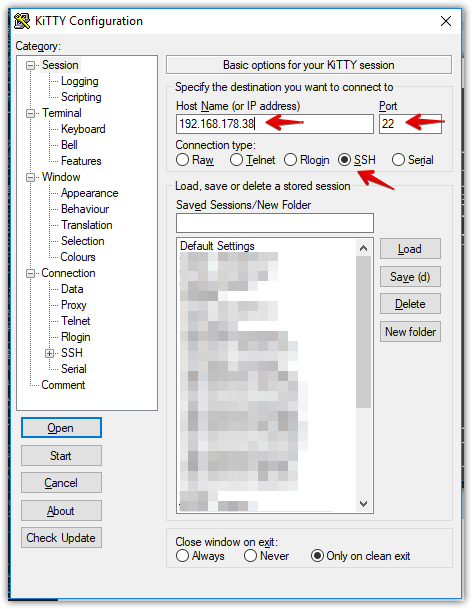
Open KiTTY and connect to the target device.
Make sure to select SSH with port 22 and enter the IP address of the target device. Press the Open button.
 Figure 1. KiTTY Configuration
 -
Gain root permissions either by logging in as user root or by login in as a default user and executing sudo -s.
 Figure 2. KiTTY Configuration
As an example, for the FENECON Energy Management System (FEMS) it is required to:
login as:fems
fems@192.168.178.38’s password:device specific password
…
fems@femsXXX:~$sudo -s
[sudo] password for fems:device specific password
root@femsXXX:/home/fems#
-
-
Connect via SCP using WinSCP
-
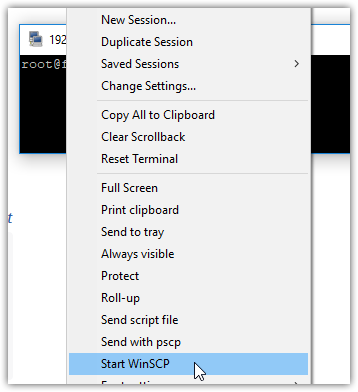
If you are lucky and have a fully configured system, right-click on the KiTTY window bar and select Start WinSCP.
 Figure 3. Start WinSCP from KiTTY
 -
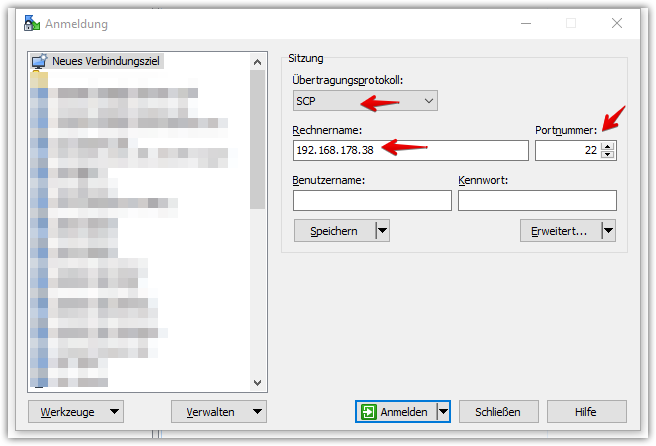
Otherwise open WinSCP separately, create a new connection, select SCP as protocol and enter again the IP address and port 22. Click Connect once finished.
 Figure 4. Start WinSCP from KiTTY
-
1.2. Prepare operating system environment
1.2.1. Check JAVA version
Ensure that a JRE version 21 or later is installed. We recommend using temurin-21-jre
For detailed installation instructions, visit Adoptium Installation Guide.
| If you are using an ARM32 device, download temurin-21-jre-armhf_21.0.6+2.deb directly from OpenEMS. |
1.2.2. Create an application directory
Create the directory /usr/lib/openems. This is going to be the place, where we put the JAR file.
Execute mkdir /usr/lib/openems.
1.2.3. Create a config directory
Create the directory /etc/openems.d. This is going to be the place, where all the bundle configurations are held.
Execute mkdir /etc/openems.d.
1.2.4. Create a systemd service definition
The systemd 'Service Manager' manages system processes in a Debian Linux. We will create a systemd service definition file, so that systemd takes care of managing (starting/restarting/…) the OpenEMS Edge service.
-
Create and open the service definition file.
Execute
nano /etc/systemd/system/openems.service -
Paste the following content:
[Unit]
Description=OpenEMS Edge (1)
After=network.target (2)

[Service]
User=root (3)
Group=root
Type=notify (4)
WorkingDirectory=/usr/lib/openems
ExecStart=/usr/bin/java -Dfelix.cm.dir=/etc/openems.d/ -jar /usr/lib/openems/openems.jar (5)
SuccessExitStatus=143 (6)
Restart=always (7)
RestartSec=10 (8)
WatchdogSec=60 (9)

[Install]
WantedBy=multi-user.target
1 The name of the service. 2 The service is allowed to start after network is available (e.g. to be able to access devices via ethernet connection) 3 It is run as user 'root' to have access to all devices. It is recommended to change this for productive systems. 4 OpenEMS notifies systemd once it is started up properly. 5 The start command executes Java, sets the config directory to /etc/openems.dand runs the jar file at/usr/lib/openems/openems.jar6 In contrast to what systemd expects, Java exits with status 143 on success. 7 Systemd always tries to restart OpenEMS once it was quit. 8 Systemd waits 10 seconds till the next restart. 9 Systemd expects OpenEMS to trigger its watchdog once every 60 seconds. OpenEMS is doing that by default if it detects that it is run by systemd. -
Press Ctrl + x to exit and y to save the file.
-
Activate the service definition:
Execute
systemctl daemon-reload
1.2.5. Update OpenEMS Edge JAR file
To update the OpenEMS JAR file at the target device, it is required to copy the JAR file from your build directory (see Build OpenEMS Edge) to /usr/lib/openems/openems.jar on the target device. Afterwards it is required to restart the systemd service
-
Copy JAR file via SCP.
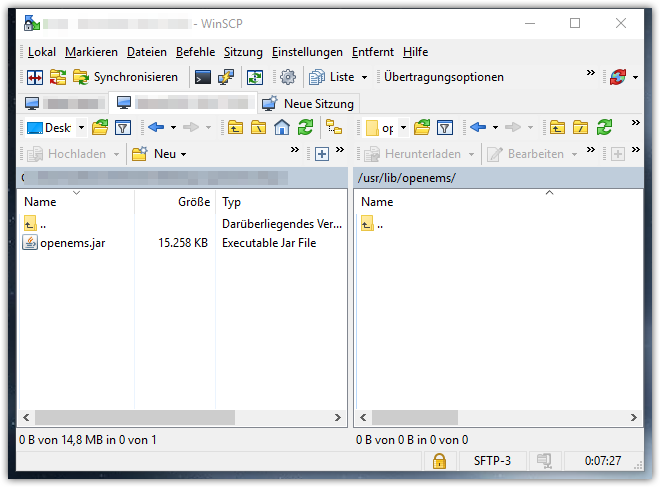
In WinSCP open your local build directory on the left side and /usr/lib/openems/ on the right side. Then drag and drop the file from left to right.
 Figure 5. WinSCP copy file
 -
Restart OpenEMS systemd service.
Execute
systemctl restart openems --no-block; journalctl -lfu openemsThe command restarts the service (systemctl restart openems) while not waiting for the OpenEMS startup notification (--no-block). Then it directly prints the OpenEMS system log (journalctl -lfu openems).
 Figure 6. OpenEMS Edge start-up
2. Docker
This chapter explains how OpenEMS can be deployed using our official Docker image.
Prerequisites:
-
A amd64 or arm64 device running Linux. You need the IP address and SSH access.
-
A working docker environment. To setup follow instruction from docs.docker.com.
2.1. Prepare system
2.1.3. Setup docker
To setup docker follow the instuctions from docs.docker.com.
2.2. Start Container
2.2.1. Create a Docker compose
Paste content into a docker-compose.yml
services:
  openems-edge:
    image: openems/edge:latest
    container_name: openems_edge
    hostname: openems_edge
    restart: unless-stopped
    volumes:
      - openems-edge-conf:/var/opt/openems/config:rw
      - openems-edge-data:/var/opt/openems/data:rw
    ports:
      - 8080:8080 # Apache-Felix

volumes:
  openems-edge-conf:
  openems-edge-data:
2.2.2. Run compose file
To start the previously created docker-compose.yml run the command:
docker compose up -d
2.2.3. Check logs
To check if the container is up and running, check docker ps:

or read its logs with:
docker logs openems_edge
| If you want to start a UI instance as well, see: https://github.com/OpenEMS/openems/tree/develop/tools/docker/edge. |

